Easy Breezy

Easy Breezy
Being creative every day and making it look Easy Breezy!

Thursday, December 1, 2011

Mesh Garland

I was feeling so ahead of the game this year because I started getting out my Christmas decorations Thanksgiving weekend.  I usually don't start until the weekend after that, but I got a little earlier start this year, mainly because I was dying to hang my new mesh wreath.

I always hang a wreath and a garland around my front door.  This year my garland just looked sad and plain next to my new fabulous wreath.  I had to remedy that situation, so I pulled out the mesh again and got busy gussying up my garland.  Please ignore the reflection of me snapping the picture but notice the sweet little face gazing out the door watching me
!


Here is how I did it!


I had bought this pre-lit garland 50% off after Christmas last year and got it for $5!

I stretched it out and fluffed it.

 I started by gathering the mesh at one end and attaching it by using two pieces of the garland like a twist tie. 
Then I measured a length of garland.  I held it in my hand and measured up to about my elbow (about 12inches).  You can make your loops fuller or less full depending on your taste.


Go down the entire length of the garland and viola!

I added this green and red garland to my "banister".


And to my mantel.  Notice the half lit garland!  Grrr... Christmas lights have been on my last nerve this season!  Would you believe that the entire town was out of white lights last weekend?  I went to two Walmarts, Target, Lowe's and Home Depot before I finally found ONE dinky 200 light strand at CVS!!  What's up with that? 

My tree doesn't have nearly as many lights as usual, but I think it's pretty anyway.

Now that the decorating is done I've got to get busy shopping and wrapping and baking and partying!  Merry Christmas y'all!

Join me here:


Saturday, November 19, 2011

Lovin' Some Mesh!

I've had the opportunity to visit some craft fairs lately in my area.  I love, Love, LOVE going to Christmas Made in the South every year.  I went one weekend down in Columbus and then the next weekend when they were in Macon.  I live kind of in the middle, so I went to both!  Then this weekend I went to the Mistletoe Marketplace down in Perry.  The hot item seemed to be the booths that were selling wreaths and bows out of deco mesh!  Have y'all heard of this stuff??  It is awesome!  It's a 21 inch wide mesh that is weather proof.  It comes in lots of colors and patterns too.  I am wild about it!  Wild I say!!

If y'all are like me though, you look at these gorgeous things and say, "I can make that!"  Half the time I never do make it, but this time I did!  I marched myself to Hobby Lobby and bought some of that mesh and a wreath frame and some coordinating ribbon and I got busy.  Here is the result!
I used an 18 inch wire frame


I found this ornament for 99 cents at Walmart and hot glued it onto the mesh


I found this wired ribbon at Hobby Lobby.  I made a bow and added it on top of a red mesh bow.

I love this glittery pick.

I found this glittery ribbon and ornaments at Walmart
I am so thrilled with my wreath!  I even bought more of the mesh and I have big plans to transform my garland around the door and down my stairs and on the mantle!  Those things will have to wait until after Thanksgiving though.  I can only handle one holiday at a time!

Join me here:

Sunday, November 13, 2011

We're Bringing the 70's Back

My daddy turned 70 years old this week and we wanted to do something really special for his birthday, so we planned a surprise 70's party for him.  Everyone dressed like it was the 1970's.  If you lived during that time you know that the 70s covered a wide range of looks.  From hot pants and go-go boots, to tie-dye shirts and headbands, to hairy chests and leisures suits!  I think we covered all those looks at the party last night!
We told Daddy we were going to get together and have a cook-out to celebrate his birthday, so he knew we were getting together, but he didn't know the theme or that we'd invited forty people!  He was certainly surprised at all that, but I think even more surprised at the Elvis costume we'd ordered for him to wear!  After all he was the King of the Party!

This is my daddy and his siblings.  I think they represented the 70's from beginning to end!

Surprise!!
I love all the costumes.


My cousins
My brother-in-law in his authentic Harlem Globetrotters jersey.

I hardly recognized my own son!

My sister looking very retro.

I ordered this door hanging for photo ops.

Me in my "Rhoda Morganstern" scarf with Luke and Josh 

Seventy years of pictures

From Disco Queens to CB Radio Truckers

Remember these shoes?
My brother and his wife looking very "Partridge Family"

Peace and Love Y'all

Love all the afros!


A groovy cake

Have a Nice Day cookies


The whole bunch!

Join me here:
Debbiedoos Newbie Party


Monday, November 7, 2011

Say Yes To The Cookie

This week I had a special request from my friend.  Her son had plans to propose to his sweet girlfriend this past weekend,  what better weekend than the Georgia/Florida game? (and Georgia beat Florida for the first time in years!  Go Dawgs!).  Anyway, she asked me to make some cookies for when they came home to announce their engagement.  We searched the town over for an engagement ring cookie cutter, but none was to be found.  We opted for the wedding cake one instead since we didn't have time to order the other one online.

I made my favorite sugar cookie dough recipe.  You can get it here.

The first step in decorating is to outline the cookie.  I add my icing into a piping bag or a bottle with a narrow tip and I trace around the cookie. This icing needs to be a little thicker so it holds it shape and doesn't run.  This acts as a dam for when you add the flooding icing. Save this thicker icing for your details.  Let the outline dry for a couple minutes and then add your icing to the middle of the cookie.  This is called flooding icing. You want your flooding icing to spread easily and level out on its own.  Ice the cookie and let it dry completely.  This takes about 30 minutes.  Then go back and pipe on the details and add sprinkles.  I tinted the icing for the details with a tiny bit of cocoa powder just to give it a little contrast.  I love the look of the little pearl dragees on this one.

On this one I just piped on the decorations and then sprinkled on the fine crystal sprinkles.


This one is a combination of sprinkles and candy pearls.

And here are the three designs I decided on.  I love how they turned out!  Maybe they'll ask me to make them for the wedding!

Join me here:

Friday, October 21, 2011

Sew Busy

I got a call from a girl I work with the other night.  She has a friend who sews children's clothing that she sells at craft shows and apparently, this being her busy time of year, she had gotten behind and needed some help sewing and getting caught up.  That's where I came in.  I have been sewing up a storm for the past two weeks.  I've sewn over 50 darling dresses.  My dining room resembles a sweat shop!  Everywhere I go random people pull stray threads off my clothes and out of my hair.  You should have seen the huge pile of serger confetti (that is my name for the little strips of fabric left behind when you serge something) I accumulated after sewing that many dresses!  Surely there is something fabulous that can be made with serger confetti.  I used to make handmade paper - I'll bet serger confetti would be great for that!

Anyway, I've just been so busy sewing I've gotten behind on my blogging so I thought I'd take a break from my Singer and share something I made for a ladies dinner last week.

The ladies in my Sunday school class planned a ladies night out and my friend Amy offered to host it at her house.  She made a yummy pasta dish and everyone else signed up to bring the salad, bread, dessert and drinks.  I brought the dessert and the sweet tea.

I've been seeing all these cute desserts in the Mason jars online lately, so I thought I'd give it a try.  Here is my version of dessert in a jar.


I made my "dump cake" recipe, which is the easiest dessert ever!  All you need is a can of pie filling, I used peach and apple (shown here) and cherry (my favorite) a box of yellow cake mix, chopped pecans and two sticks of butter.  I spooned 1/3 a can of pie filling into each jar, then I chopped up about 3 cups of pecans and mixed them into the dry cake mix. I then spooned the dry cake mix and pecan mixture on top of the pie filling.  I just divided it up evenly among the nine Mason jars.  Lastly I dotted cold cubes of butter on top of the cake mix (about a tablespoon per jar).  Bake uncovered at 350 degrees for 45 minutes to an hour until pie filling is bubbly.  I placed my jars in a deep roasting pan just to make it easier to get them in and out of the oven, but you could use a cookie sheet too.  When I took the jars out of the oven I covered them with the lids.  You could hear the jars sealing up like I had just made preserves or something!  Then I tied raffia around the top and added a spoon.  I lined my cooled roasting pan with some fall towels, put the jars back in and that is how I carried them to my friends house!  I also brought along some whipped cream, but I think a scoop of vanilla ice cream on this warm dessert would have put it over the top!

My easy breezy dessert was a big hit!

Join me here:

Monday, October 10, 2011

I Couldn't Help Myself!

Okay, if anyone overhears me saying I'm going to Hobby Lobby or Hancocks, please host an intervention!  Things are really getting out of hand with all the fabric buying.  I may have to start quilting to use up all my scraps, because y'all know a true crafter NEVER throws away scraps! 

So anyway,  I was strolling through Hancocks the other day just "looking" and I saw this adorable fabric!  I thought to myself, "my darling niece NEEDS something made from this!"  So I bought this cute witch hat fabric, then ran right next door to Hobby Lobby... you can see why I'm having such issues with Hobby Lobby and Hancocks right next door to each other... and I bought the orange and white polka dot. 
Then I rushed home and whipped up this little cutie!


The beauty of a pillowcase dress is that next year she can wear it as a top with a pair of leggings since babies don't really get wider just longer!

Sharing with:

Thursday, October 6, 2011

Trick or Treat Smell My Feet...

...give me something good to eat!  It's getting to be that time of year!  My son in law calls it "The Gilmer Eating Season".  We start with an annual family reunion the second weekend in October and we don't stop eating until after New Year's.  It's just one long eat-fest, with football games and birthday parties and family reunions and holidays all running together for three whole months and  I love every minute of it!  It's really the only time of year I enjoy cooking.  I don't dislike cooking, but I do get board of the every day what's-for-dinner routine.  When the eating season rolls around I get to pull out the good stuff, the recipes that define this holiday or that.  Like my sweet potato souffle with the brown sugar and pecan topping.  It wouldn't be Thanksgiving without it.  I'd sooner give up turkey!  But don't let me get ahead of myself, I've got a lot of eating to do between now and Thanksgiving! 

 First things first!  Taco Soup!  With the first dip in the temperature  I have to pull out my trusty recipe for Taco Soup.  I hear its supposed to get cool this weekend and I can't wait to make a big pot of it! I know that there are many versions of this recipe floating around, but this is mine if you'd like to give it a try.

1 lb. ground beef
1 small onion
1 pkg. taco seasoning
1 pkg. hidden valley ranch mix
4 cans Rotel Tomatoes
2 cans Shoepeg Corn
1 can Black Beans
1 can Kidney Beans
Water

Put ground beef and onion in a large pot.  Brown meat.  Drain.  Add Taco and Ranch seasonings.  Stir to coat meat and onions.  Open all your cans and dump them in!  Add water (about 4 cups) to fill pot.  Stir.  Simmer for 45 minutes.  I serve mine with Fritos and grated cheese on top and a big piece of cornbread with butter on the side! YUM!

Secondly is Halloween.  My oldest son was born on Halloween so I tried to come up with some special treats to serve at his birthday party.  One of my favorites are these ghost lollipops.  I got this idea from a Martha Stewart magazine many years ago and they have always been a hit. 

Can you believe I painted this tin can about fifteen years ago!  Actually I painted several and used them to hold utensils (or lollipops) at my son's birthday party.  I still use them all these years later.

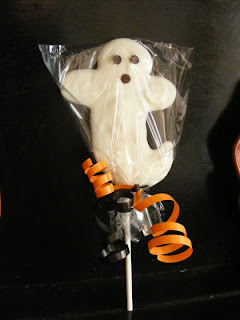
To make the ghost lollipops I melt white chocolate almond bark over low heat.  I don't use a double boiler, but you can if you don't think you'll be able to stand by the stove, constantly stirring until the chocolate is melted.  I also add a teaspoon or two of Crisco shorntening.  The shortening helps thin the consistency out a bit and keeps the chocolate from seizing up.  Do NOT use oil.  Only shortening will work. When the chocolate is melted, spoon chocolate onto a cookie sheet covered with wax paper.  Using the back of the spoon spread the chocolate into a ghost shape.  You could also add the chocolate to a piping bag and pipe out your ghost shape. My ghosts are about 3 inches tall.  Lay a lollipop stick into the wet chocolate and cover the stick with a bit more chocolate to anchor the stick.  Then take 3 mini-chocolate chips and place them pointy side down to make a ghost face.  Refrigerate until firm (about an hour). I place the ghosts into a lollipop bag and tie with orange and black curling ribbon. 

Then there is the pumpkin cake.  I've made this cake for my son's birthday almost every year.  A couple of times I strayed from the pumpkin cake and made a scarecrow cake and a haunted house cake and my biggest cake disaster, the candy corn cake.  It looked like a big orange, yellow and white hill.  If people have to ask what it's supposed to be, you can pretty much chalk it up as a "cake fail!"  But the pumpkin cake has always been a success.  Although every year I forget to save a soup can to bake the stem in and I'm always running out at the last minute to buy soup!  I should put that with my recipe - eggs, butter, flour, one can of cream of mushroom soup...
This cake is actually two bundt cakes stacked on top of each other.

Seth's 18th birthday party. 

Seth was wishing he'd get accepted at UGA.  His wish came true!

Sharing with:


Friday, September 30, 2011

The Trick or Treat Dress

Remember this cute fabric?

Well here's what I made out of it.

I just adore the trick or treat fabric!  Isn't this knot dress pattern the cutest?  I can't wait to see the baby in it!

As I was cleaning up my sewing area I came across this rick rack and it was exactly enough to use on the dress!

I just love some cute rick rack!

Now to make her a second dress using this fabric.
I'm thinking a long sleeved peasant dress with ruffle legged pants for the fall.

Join me at:
view sourceprint? 01 09 10